DWBooster Integration for Calculated Fields Form with Google Calendar
Compatible with CFF: Free Professional Developer Platinum
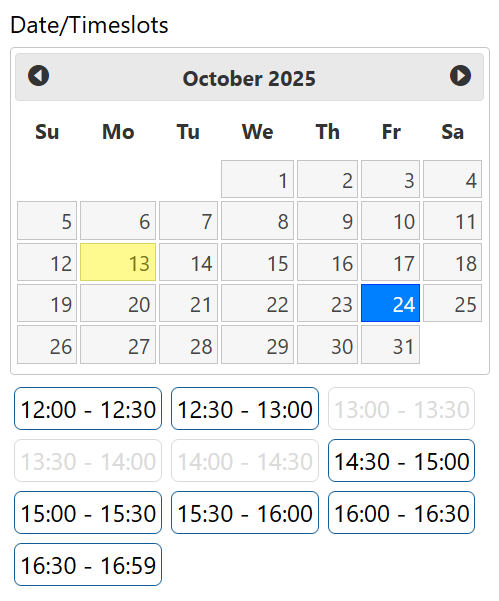
Easily sync your "Calculated Fields Form" Date/Timeslots controls with Google Calendar to manage schedules and prevent overlapping events.
The "DWBooster Integration for Calculated Fields Form with Google Calendar" plugin enables seamless synchronization between your "Calculated Fields Form" Date/Timeslots controls and Google Calendar, helping you avoid event conflicts. It automatically disables any timeslots in your form that overlap with busy periods on your connected calendar and create Google Calendar events directly using the information submitted through your form.
The installation process of the "DWBooster Integration for Calculated Fields Form with Google Calendar" plugin is similar to that of any other WordPress plugin. Note this plugin requires you must have installed the Calculated Fields Form plugin installed.
- Download the ZIP file containing the plugin's code to your computer (using the download link provided after purchase), and then follow these steps:
- Go to the Plugins section in your WordPress dashboard.
- Click the "Add New" button at the top of the page.
- Click the "Upload Plugin" button, then select the previously downloaded ZIP file.
- Finally, install and activate the plugin.
Once activated, the plugin adds a new menu option:
Calculated Fields Form > Google Calendar
This page allows you to link your forms to Google Calendar for easy event management and conflict prevention.
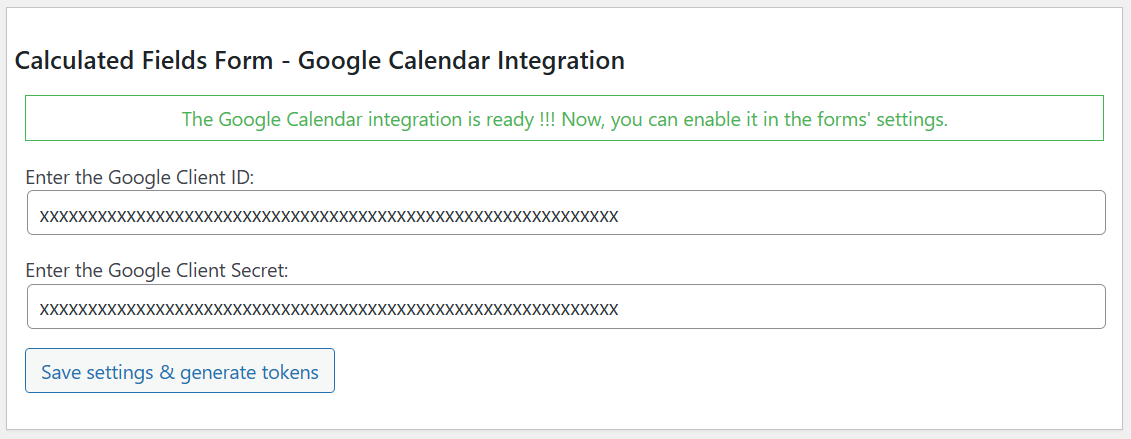
🗓️ Google Calendar Integration
To connect your website with Google Calendar, you need a Google Client ID and Google Client Secret. Follow the steps below:
- Go to the Google Cloud Console.
- Create a new project - or select an existing one.
- Name your project. Google Cloud will automatically generate a unique Project ID.
- Your project name will appear at the top of the left sidebar.
- From the left menu, go to APIs & Services → Library.
- Search for Google Calendar API and enable it.
🔑 Create OAuth Credentials
- Navigate to APIs & Services → Credentials.
- Click "Create Credentials" → "OAuth Client ID."
- If prompted, configure your OAuth consent screen first (see the next section).
- Choose Web Application as the Application Type.
- Enter a Name for the credentials.
- Under Authorized JavaScript origins, add your website domain (e.g.,
https://yourdomain.com). - Under Authorized redirect URIs, paste the Redirect URL provided in the plugin interface.
- Click Create. You'll now see your Client ID and Client Secret.
🧾 Configure the OAuth Consent Screen
- Go to APIs & Services → OAuth consent screen.
- Under User Type, select External (recommended).
- Fill in the required information such as App Name, User Support Email, and Developer Contact Info.
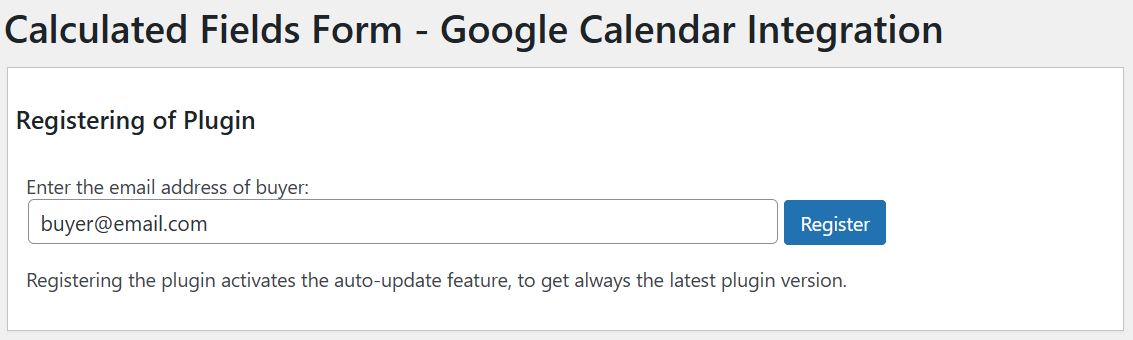
- In the Test Users section, add the email address of the Google Account you'll use to connect the calendar.
⚙️ Connect Your Website
- In your plugin settings page, enter the Client ID and Client Secret.
- Click "Save Settings & Generate Tokens."
- You'll be redirected to your Google Account to grant permission for your website to access your calendars.
Once you've completed these steps, your website will be successfully linked with Google Calendar.
Upon configuring the global settings and obtaining the access token, we are ready to seamlessly integrate our forms with Google Calendar.
Integration in Forms
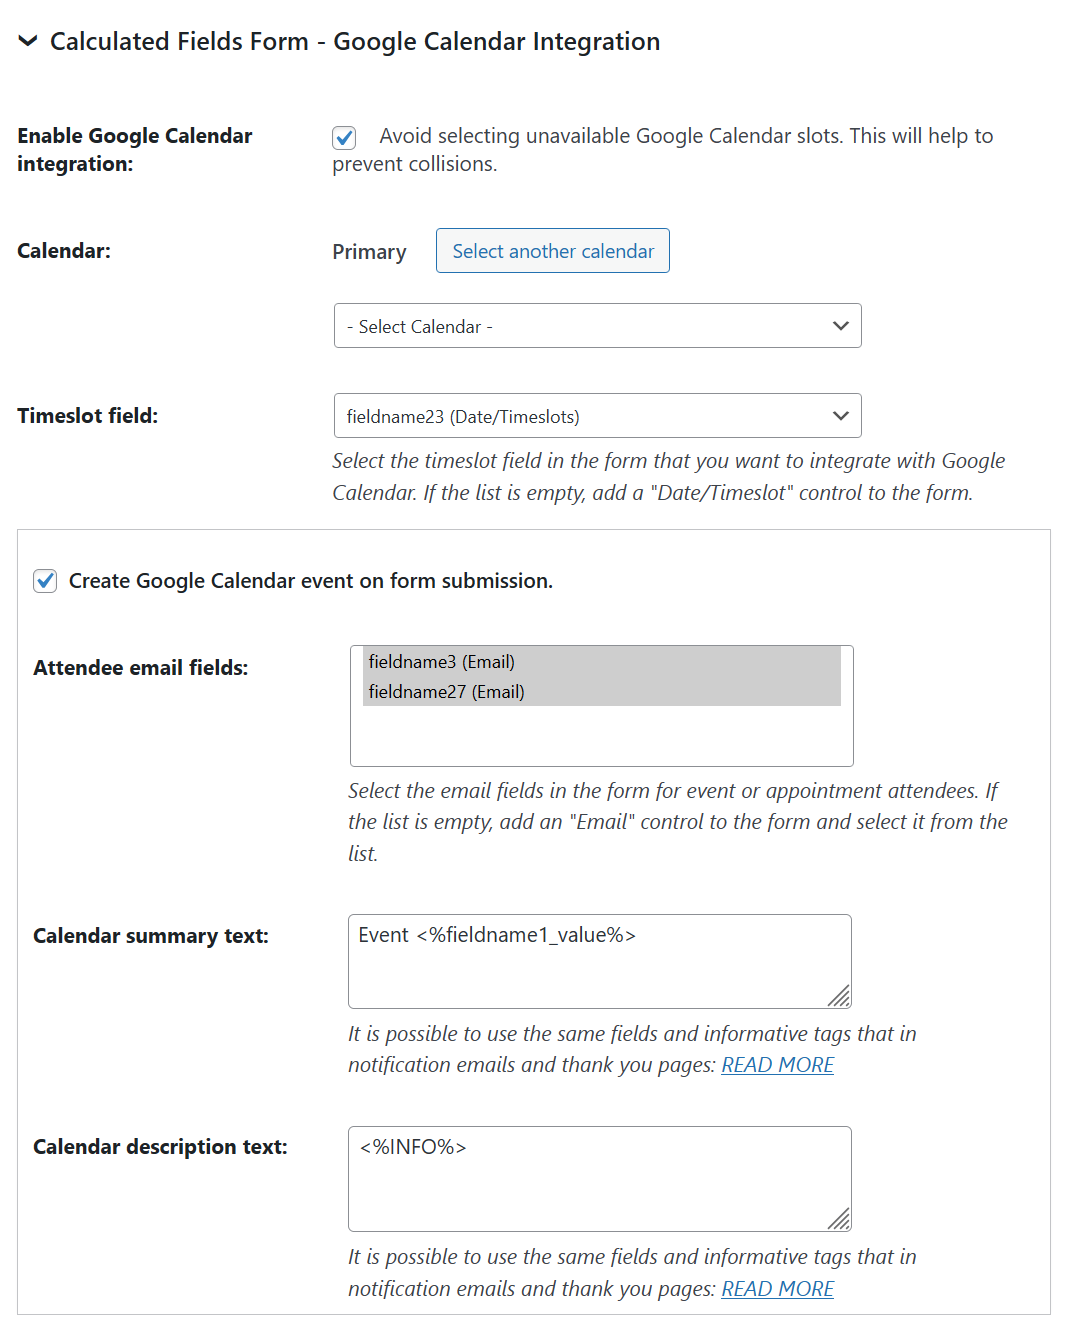
The plugin adds a new section in the form settings titled: "DWBooster Integration for Calculated Fields Form with Google Calendar"
🔧 How to integrate the plugin with a form
- Press the "Build" button corresponding to your form in the "Forms" list, which is accessible via the "Calculated Fields Form" menu option.
- Scroll down to the "DWBooster Integration for Calculated Fields Form with Google Calendar" section.
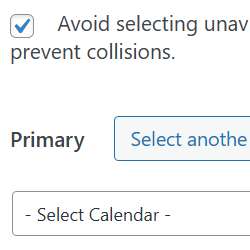
- Tick the "Enable Google Calendar integration" checkbox.
- By default, the plugin selects your "primary" calendar. To use a different one, press the "Select another calendar" button. This will load a list of calendars associated with your account, allowing you to select the calendar you want to associate with the form.
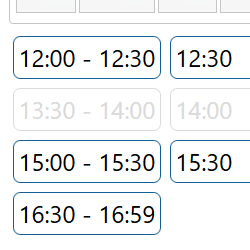
- Insert a Date/Timeslot control in the form, and select it from the "Timeslot field" list. The plugin will link this control to Google Calendar for scheduling.
📅 Creating Google Calendar events from form submissions
- Tick the "Create Google Calendar event on form submission." checkbox.
- Select the email controls from the "Attendee email fields" attribute. The plugin will add the collected emails as attendees of the calendar event.
- Enter the event summary in the "Calendar summary text" text area.
- Enter the event description in the "Calendar description text" text area.
Note: Both the summary and description attributes support the same fields and informative tags that are available in the notification emails.
Screenshots